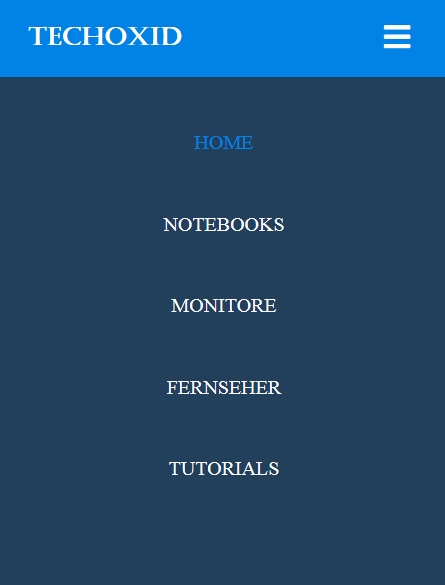
Wir erstellen in diesem Tutorial ein Menü das responsive ist und sich an die Breite des Displays anpasst. So passt sich das Menü entsprechend in seiner Größe und seiner Darstellung an.

Tutorial im Video
HTML-Grundlagen
<!DOCTYPE html>
<html lang="de" dir="ltr">
<head>
    <meta charset="utf-8">
    <meta name="viewport" content="width=device-width,inital-scale=1.0">
    <title>Responsive Menü</title>
    <link rel="stylesheet" href="style.css">
    <script src="https://kit.fontawesome.com/a076d05399.js"></script>
    </head>
   <body>
    <nav>
       <input type="checkbox" id="check">
        <label for="check" class="checkbtn">
        <i class="fas fa-bars"></i>
        </label>
        <label class="logo">Techoxid</label>
        <ul>
            <li><a class="active" href="#">Home</a></li>
            <li><a href="#">Notebooks</a></li>
            <li><a href="#">Monitore</a></li>
            <li><a href="#">Fernseher</a></li>
            <li><a href="#">Tutorials</a></li>
        </ul>
       </nav>
       <section></section>
    </body>
</html>
- Fontawesome und „fas fa-bars“: Hiermit stellt man das Hamburgermenü mithilfe von „FontAwesome“ dar.
- checkbox und checkbtn: Für das mobile Menü mit dem Hamburgermenü, das sich entsprechend auf Knopfdruck anzeigen soll, brauchen wir eine Checkbox. Diese Checkbox ersetzt schließlich eine Javascript-Funktion. Im CSS wird die Checkbox durchgehend versteckt, der Button „fas fa-bars“ zeigt sich nur ab einer Breite von 858 Pixeln, also im mobilen Menü.
CSS-Styling
*{
    padding: 0;
    margin: 0;
    text-decoration: none;
    list-style: none;
    box-sizing: border-box;
}

body{
    font-family:montserrat;
    background: url(hintergrund.jpg) no-repeat;
    background-size: cover;
    height: 100vh;
   }

nav {

    background: #0082e6;
    height: 80px;
    width: 100%;
}

label.logo{
    color: white;
    font-size: 35px;
    line-height: 80px;
    padding: 0 80px;
    font-weight: bold;
    font-family:castellar;
}

nav ul {

    float: right;
    margin-right: 20px;
}

nav ul li{
    display: inline-block;
    line-height: 80px;
    margin: 0 5px;
}
nav ul li a {
    color: white;
    font-size:20px;
    text-transform: uppercase;

}

a.active, a:hover{
    background: #1b9bff;
    transition: .3s;

}

.checkbtn {
    font-size: 30px;
    color: white;
    float:right;
    line-height:80px;
    margin-right: 40px;
    cursor: pointer;
    display:none;

}

#check {
    display:none;

}

@media (max-width:999px){
    label.logo{
        font-size:25px;
        padding: 0 30px;
    }

    nav ul li a{
        font-size:16px;
    }

}

@media (max-width:858px){
    .checkbtn{
        display: block;
    }
    ul{
        position: fixed;
        width: 100%;
        height: 100vh;
        background: #223f5b;
        top:80px;
        left:-100%;
        text-align: center;
        transition: all .3s;

    }
    nav ul li{
        display: block;
        margin:50px 0;
        line-height: 30px;
    }

    nav ul li a {
        font-size: 20px;
    }

    a.active,a:hover{
        background: none;
        color: #0082e6;
    }
    #check:checked~ul{
        left:0;
    }
}
- @media: hier bestimmen wir die maximale Größe, für die bestimmte Einstellungen gelten. So etwa wird bis zu einer Breite von 858 Pixeln das mobile Menü angezeigt, zusammen mit dem Hamburgerbutton.
Weitere Tutorials:
- Ebenfalls mit HTML und CSS: Transparentes Dropdown Menü
Andere Themen auf dieser Seite:
Für Gamer: Gaming PCs mit 16 GB RAM – mit verschiedenen Grafikkarten

